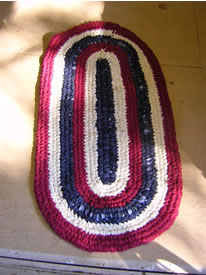
{"id":329675789,"title":"Toothbrush Rug - Frequently Asked Questions","handle":"frequently-asked-questions","description":"\u003cp\u003e\u003cstrong\u003eHere are a few helpful hints for the patterns that ruggers\u003cbr\u003e tend to forget or overlook.\u003c\/strong\u003e\u003c\/p\u003e\r\n\u003col\u003e\r\n\u003cli\u003e\r\n\u003cdiv align=\"left\"\u003eLay your rug down every couple of rows to make sure it's laying flat. If it is cupping, increase MORE. If it is ruffling, DON'T increase for a round or so, or do decrease at the ruffle. It's not necessary to tear our this rug.\u003cbr\u003e \u003c\/div\u003e\r\n\u003c\/li\u003e\r\n\u003cli\u003e\r\n\u003cdiv align=\"left\"\u003eThe pattern says to go three times in the SAME hole only ONCE on the oval and heart. After that, do increase about three times on each end, but as it shows on the top of page four. Two ways to know if you need to increase:\u003c\/div\u003e\r\n\u003c\/li\u003e\r\n\u003col type=\"A\"\u003e\r\n\u003cli\u003e\r\n\u003cdiv align=\"left\"\u003eTwo big holes - go in between (increase)\u003c\/div\u003e\r\n\u003c\/li\u003e\r\n\u003cli\u003e\r\n\u003cdiv align=\"left\"\u003eLong distance to the next stitch (material has to pull too far) increase.\u003cbr\u003e \u003c\/div\u003e\r\n\u003c\/li\u003e\r\n\u003c\/ol\u003e\r\n\u003cli\u003e\r\n\u003cdiv align=\"left\"\u003eThe worker and filler (runner) are normally the same color. Change colors at the end of the oval or heart, and at the same place on the round.\u003cbr\u003e \u003c\/div\u003e\r\n\u003c\/li\u003e\r\n\u003cli\u003e\r\n\u003cdiv align=\"left\"\u003ePursue - When starting a rug, it looks ugly. Go three rounds and it will improve. If all else fails, I do sell the starts. The practice start that you receive with the pattern is for you to \"practice\" on. It is much easier to start a rug when you have learned how to hold the needle, your fingers and have your tension even.\u003cbr\u003e \u003c\/div\u003e\r\n\u003c\/li\u003e\r\n\u003cli\u003e\r\n\u003cdiv align=\"left\"\u003eIt's important that your material be the same weight (width). Wool and denim should be narrower. Place mats require narrower material. Basket material should be about four or five inches wide.\u003cbr\u003e \u003c\/div\u003e\r\n\u003c\/li\u003e\r\n\u003c\/ol\u003e\r\n\u003cp\u003e\u003cb\u003e\u003cspan style=\"font-size: xx-small;\" size=\"+1\"\u003eFrequently Asked Questions\u003c\/span\u003e\u003c\/b\u003e\u003c\/p\u003e\r\n\u003cp align=\"left\"\u003e\u003cb\u003e1. What size rug can you make?\u003c\/b\u003e\u003c\/p\u003e\r\n\u003cp align=\"left\"\u003eAny size! The middle of the rug (the start) is the length minus the width of the finished rug. So if you want a hall runner 7 feet long and 3 feet wide, you start with 7-3=4 feet of casting on. A runner is a difficult rug to make.\u003c\/p\u003e\r\n\u003cp align=\"left\"\u003e\u003cb\u003e2. How do you keep the rug laying flat?\u003c\/b\u003e\u003c\/p\u003e\r\n\u003cp align=\"left\"\u003eIt’s not an EXACT formula. Different materials and different people’s stitches come into play. You need to lay your rug down often and check it. If it is cupping (becoming a bowl), you need to increase a lot more for a couple of rows. If it is ruffling (becoming a doily), you need to not increase for a couple of rows, maybe even decrease. Keep laying it down to check flatness, but the usual number of increases on an oval is 3-5 on each end.\u003c\/p\u003e\r\n\u003cp align=\"left\"\u003e\u003cb\u003e3. How much material does a rug take?\u003c\/b\u003e\u003c\/p\u003e\r\n\u003cp align=\"left\"\u003eA 24 x 36 inch rug takes 10 yards of material or 3 pounds. A pound is 3 1\/3 yards of 45 inch wide material. I cut it 2 ½ “ wide. I use 4-5” wide strips for baskets and 1 ½ “ wide for placemats.\u003c\/p\u003e\r\n\u003cp align=\"left\"\u003e\u003cb\u003e4. Which is easier: a round or oval rug?\u003c\/b\u003e\u003c\/p\u003e\r\n\u003cp align=\"left\"\u003eIt depends on who you ask. Both are equally easy for us. The rectangle and half-moon are the hardest. Make the heart after you’ve made an oval. It’s not difficult. Baskets are easy also. What’s nice is you use the same buttonhole stitch for everything and everything is explained in our one pattern booklet.\u003c\/p\u003e\r\n\u003cp align=\"left\"\u003e\u003cb\u003e5. What is a practice start?\u003c\/b\u003e\u003c\/p\u003e\r\n\u003cp align=\"left\"\u003eWe invented that to make teaching and learning easier. It’s a small oval, about 5” long and 3” wide, has a homemade wooden needle on the worker, ready to go. We’ve found once you learn to do the buttonhole stitch and increase properly, starting your first oval is much easier. Everyone we teach starts with a practice start.\u003c\/p\u003e\r\n\u003cp align=\"left\"\u003e\u003cb\u003e6 .What material works best?\u003c\/b\u003e\u003c\/p\u003e\r\n\u003cp align=\"left\"\u003eSheeting and cottons are good. We’ve used lace, satin, denim, wool, stretchy knits, sheers and blends. When using wool, denim, or heavy material cut it narrower. They are not our favorite. Do not use corduroy or chenille. Too messy!\u003c\/p\u003e\r\n\u003cp align=\"left\"\u003e\u003cb\u003eIf you have any other questions feel free to ask.\u003c\/b\u003e\u003c\/p\u003e\r\n\u003col\u003e\r\n\u003cli\u003e\r\n\u003cdiv align=\"left\"\u003eOur new DVD\/video is 1 hour and 35 minutes long and has both right and left handed demonstrations of all techniques for making rugs, including inventions and trouble shooting.\u003c\/div\u003e\r\n\u003c\/li\u003e\r\n\u003c\/ol\u003e\r\n\u003cp\u003e \u003c\/p\u003e\r\n\u003chr\u003eX","published_at":"2014-06-12T15:12:54-05:00","created_at":"2014-06-12T15:17:55-05:00","vendor":"Dewberry Ridge","type":"Instruction","tags":[],"price":0,"price_min":0,"price_max":0,"available":true,"price_varies":false,"compare_at_price":null,"compare_at_price_min":0,"compare_at_price_max":0,"compare_at_price_varies":false,"variants":[{"id":794851493,"title":"Default Title","option1":"Default Title","option2":null,"option3":null,"sku":"","requires_shipping":true,"taxable":false,"featured_image":null,"available":true,"name":"Toothbrush Rug - Frequently Asked Questions","public_title":null,"options":["Default Title"],"price":0,"weight":0,"compare_at_price":null,"inventory_quantity":-6,"inventory_management":null,"inventory_policy":"deny","barcode":"","requires_selling_plan":false,"selling_plan_allocations":[]}],"images":["\/\/www.dewberryridge.com\/cdn\/shop\/products\/rug2_dc0b186a-c3ad-48fa-bfba-30dff4d87d95.jpg?v=1402604276"],"featured_image":"\/\/www.dewberryridge.com\/cdn\/shop\/products\/rug2_dc0b186a-c3ad-48fa-bfba-30dff4d87d95.jpg?v=1402604276","options":["Title"],"media":[{"alt":null,"id":22202384419,"position":1,"preview_image":{"aspect_ratio":0.749,"height":275,"width":206,"src":"\/\/www.dewberryridge.com\/cdn\/shop\/products\/rug2_dc0b186a-c3ad-48fa-bfba-30dff4d87d95.jpg?v=1402604276"},"aspect_ratio":0.749,"height":275,"media_type":"image","src":"\/\/www.dewberryridge.com\/cdn\/shop\/products\/rug2_dc0b186a-c3ad-48fa-bfba-30dff4d87d95.jpg?v=1402604276","width":206}],"requires_selling_plan":false,"selling_plan_groups":[],"content":"\u003cp\u003e\u003cstrong\u003eHere are a few helpful hints for the patterns that ruggers\u003cbr\u003e tend to forget or overlook.\u003c\/strong\u003e\u003c\/p\u003e\r\n\u003col\u003e\r\n\u003cli\u003e\r\n\u003cdiv align=\"left\"\u003eLay your rug down every couple of rows to make sure it's laying flat. If it is cupping, increase MORE. If it is ruffling, DON'T increase for a round or so, or do decrease at the ruffle. It's not necessary to tear our this rug.\u003cbr\u003e \u003c\/div\u003e\r\n\u003c\/li\u003e\r\n\u003cli\u003e\r\n\u003cdiv align=\"left\"\u003eThe pattern says to go three times in the SAME hole only ONCE on the oval and heart. After that, do increase about three times on each end, but as it shows on the top of page four. Two ways to know if you need to increase:\u003c\/div\u003e\r\n\u003c\/li\u003e\r\n\u003col type=\"A\"\u003e\r\n\u003cli\u003e\r\n\u003cdiv align=\"left\"\u003eTwo big holes - go in between (increase)\u003c\/div\u003e\r\n\u003c\/li\u003e\r\n\u003cli\u003e\r\n\u003cdiv align=\"left\"\u003eLong distance to the next stitch (material has to pull too far) increase.\u003cbr\u003e \u003c\/div\u003e\r\n\u003c\/li\u003e\r\n\u003c\/ol\u003e\r\n\u003cli\u003e\r\n\u003cdiv align=\"left\"\u003eThe worker and filler (runner) are normally the same color. Change colors at the end of the oval or heart, and at the same place on the round.\u003cbr\u003e \u003c\/div\u003e\r\n\u003c\/li\u003e\r\n\u003cli\u003e\r\n\u003cdiv align=\"left\"\u003ePursue - When starting a rug, it looks ugly. Go three rounds and it will improve. If all else fails, I do sell the starts. The practice start that you receive with the pattern is for you to \"practice\" on. It is much easier to start a rug when you have learned how to hold the needle, your fingers and have your tension even.\u003cbr\u003e \u003c\/div\u003e\r\n\u003c\/li\u003e\r\n\u003cli\u003e\r\n\u003cdiv align=\"left\"\u003eIt's important that your material be the same weight (width). Wool and denim should be narrower. Place mats require narrower material. Basket material should be about four or five inches wide.\u003cbr\u003e \u003c\/div\u003e\r\n\u003c\/li\u003e\r\n\u003c\/ol\u003e\r\n\u003cp\u003e\u003cb\u003e\u003cspan style=\"font-size: xx-small;\" size=\"+1\"\u003eFrequently Asked Questions\u003c\/span\u003e\u003c\/b\u003e\u003c\/p\u003e\r\n\u003cp align=\"left\"\u003e\u003cb\u003e1. What size rug can you make?\u003c\/b\u003e\u003c\/p\u003e\r\n\u003cp align=\"left\"\u003eAny size! The middle of the rug (the start) is the length minus the width of the finished rug. So if you want a hall runner 7 feet long and 3 feet wide, you start with 7-3=4 feet of casting on. A runner is a difficult rug to make.\u003c\/p\u003e\r\n\u003cp align=\"left\"\u003e\u003cb\u003e2. How do you keep the rug laying flat?\u003c\/b\u003e\u003c\/p\u003e\r\n\u003cp align=\"left\"\u003eIt’s not an EXACT formula. Different materials and different people’s stitches come into play. You need to lay your rug down often and check it. If it is cupping (becoming a bowl), you need to increase a lot more for a couple of rows. If it is ruffling (becoming a doily), you need to not increase for a couple of rows, maybe even decrease. Keep laying it down to check flatness, but the usual number of increases on an oval is 3-5 on each end.\u003c\/p\u003e\r\n\u003cp align=\"left\"\u003e\u003cb\u003e3. How much material does a rug take?\u003c\/b\u003e\u003c\/p\u003e\r\n\u003cp align=\"left\"\u003eA 24 x 36 inch rug takes 10 yards of material or 3 pounds. A pound is 3 1\/3 yards of 45 inch wide material. I cut it 2 ½ “ wide. I use 4-5” wide strips for baskets and 1 ½ “ wide for placemats.\u003c\/p\u003e\r\n\u003cp align=\"left\"\u003e\u003cb\u003e4. Which is easier: a round or oval rug?\u003c\/b\u003e\u003c\/p\u003e\r\n\u003cp align=\"left\"\u003eIt depends on who you ask. Both are equally easy for us. The rectangle and half-moon are the hardest. Make the heart after you’ve made an oval. It’s not difficult. Baskets are easy also. What’s nice is you use the same buttonhole stitch for everything and everything is explained in our one pattern booklet.\u003c\/p\u003e\r\n\u003cp align=\"left\"\u003e\u003cb\u003e5. What is a practice start?\u003c\/b\u003e\u003c\/p\u003e\r\n\u003cp align=\"left\"\u003eWe invented that to make teaching and learning easier. It’s a small oval, about 5” long and 3” wide, has a homemade wooden needle on the worker, ready to go. We’ve found once you learn to do the buttonhole stitch and increase properly, starting your first oval is much easier. Everyone we teach starts with a practice start.\u003c\/p\u003e\r\n\u003cp align=\"left\"\u003e\u003cb\u003e6 .What material works best?\u003c\/b\u003e\u003c\/p\u003e\r\n\u003cp align=\"left\"\u003eSheeting and cottons are good. We’ve used lace, satin, denim, wool, stretchy knits, sheers and blends. When using wool, denim, or heavy material cut it narrower. They are not our favorite. Do not use corduroy or chenille. Too messy!\u003c\/p\u003e\r\n\u003cp align=\"left\"\u003e\u003cb\u003eIf you have any other questions feel free to ask.\u003c\/b\u003e\u003c\/p\u003e\r\n\u003col\u003e\r\n\u003cli\u003e\r\n\u003cdiv align=\"left\"\u003eOur new DVD\/video is 1 hour and 35 minutes long and has both right and left handed demonstrations of all techniques for making rugs, including inventions and trouble shooting.\u003c\/div\u003e\r\n\u003c\/li\u003e\r\n\u003c\/ol\u003e\r\n\u003cp\u003e \u003c\/p\u003e\r\n\u003chr\u003eX"}

